Friday, December 24, 2010

Monogram Letter


This was for a friend. She bought the HUGE letter at Joann's. I used glitter paper, waxy twine, bottle caps, stickers and miscellaneous clips. I used Stampin Up Flowers and brads to add more 3-D effect. It's just randomly placed all over, perfect for a 10 year-old's room. I used a lot of decoupage and hot glue to keep it all together.

Monday, December 20, 2010

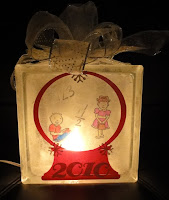
More Blocks!!!

Its really hard to take the picture with the lights on but you get the idea! Super cute though I am about to do the night lights :)

Saturday, December 18, 2010

December Hostess Sneak Peak!


Decided to stick with Christmas even though it's kinda close! I used the polished stone technique for the card. Its shiny even though you cant see it in the picture. I decided since the technique was a bit easy that I would use up some scrap paper and do some tags! I used the Contemporary Christmas and Cute Christmas from Stampin' Up. Hope the girls like it!!!

Wednesday, December 15, 2010

Glass Blocks


These are so much fun! Lots of Vinyl and a combo of Sure Cuts A Lot and Cricut Cartridges. Just had to share!


Vinyl Ornaments

These are for my daughters school. The falcon is their mascot. I used Sure Cuts A Lot to do the mascot and the letters. It was super easy!

Teacher Project EASY!

Another one of the teachers gifts for the 'Ha Ha Holidays' . I just cut presents out of Christmas Cardstock. The present is Cricut Joys of the Season. I attached 2 'aa' batteries to the back with tape. The project was for 100 faculty memebers. We did projects for 13 days for less than $150. Of course Michaels coupons and sales were involved :) Happy Crafting!!

Tuesday, December 14, 2010

Silhouette Thank You Card

I whipped these up quick for my daughters softball team parents (my husband is the head coach) to thank them for a great season. Simple card with patterened paper backing a Stampin Up Pretty in Pink paper that I ran through the Cuttlebug embossing folder (I ran 2 at a time to speed up the process). I distressed the embossed paper and adhered them all together. I used scrap paper in Pretty in Pink and Black and the punches Scallop Oval Extra Large and Large Oval from Stampin Up for the Thank You at the bottom. The silhouette is cut with the Cricut Cartridge A Child's Year. I had made bows for the girls over the season and used the leftover ribbon to cut little 1" piece and attach 4 different ribbons with a black brad.

Friday, December 3, 2010

Embossed Glass Ornament.


Glass Ornaments for the softball team. The pink jersey is embossed with pink embossing powder. I cut the shape and number on the Cricut. After placing the stencil on I used the Versa Mark to cover the inside of the stencil. I outlined the jersey and the number with an acrylic marker. I stamped the baseballs with Stampin up White Craft Ink. I sealed it with acrylic sealer.


Thursday, December 2, 2010

Reindeer Kisses

We are doing "Ha Ha Holidays" for our Faculty at my daughter's school and one idea I had was Reindeer Kisses. You gotta love the Cricut and the fact it can cut out 100 reindeer in no time. Add some googly eyes and a hershy's kiss you viola! Reindeer Kisses XOXOXOXO


Wednesday, December 1, 2010

Creation on the go!!!

I absolutely love these block projects we did at the last Stampin' up Hostess Group. They are so much fun to make. I wanted to give my in-laws a thank you for hosting us this past week but I was on the opposite site of the country. I did this block on the go with glitter foam balls inside instead of lights. The saying is out of vinyl and there are a bunch of epoxy snowflakes on the inside and outside that dont show the best in this picture. I have so many more ideas!!!

Sunday, November 21, 2010

Stained Glass Card

This is the Stained Glass Technique. It was pretty cool and dried a lot faster than I thought. I used the Top Note Sizzix Die from Stampin Up, Cherry Cobbler Paper, Clear Window Sheets from Stampin UpOld Olive Ribbon, Whisper White paper, Snowglobe Stamp from Stampin Up, and the have a cute Christmas stamp from another Stampin Up Set, Crystal Effects, and ReInkers Bashful Blue, Old Olive, Cherry Cobbler, and some Used So Saffron. We stamped the image was stamped with the Black StazOn on the window sheet and let dry for a couple minutes. Flipped the sheet over for the stained glass. We mixed 2 drops crystal effects with 1 drop of the reinker color we wanted. After coloring it in we set it aside to let it dry. We folded the Cherry Cobbler paper and ran it through the sizzix with the top note die. The white is stamped with snowflakes and the sentiment so you can see it through the window. The white is a card that opens to the right instead of a standard card fold. The two are glued together so when opened make a triangle. This way you can still write on the inside and not see it through the window.

I actually HAVE been busy!!!


Ok these are the glass blocks you can get at the craft store with a hole drilled in the bottom of them I bought my blocks with from Home Depot and had my sweet husband drill holes in them for my class. It was hard to get a picture of the bow and block because when the block is lit the flash won't work (im still working on the photo techniques :) We used Stampin' Up Jolly Holidays and StazOn Black ink for the design. The backround is done with Jesso found in the acrylic paint aisle since it dries pretty fast. We sponged on the white to give it the snow effect and then stamped when it was dry. We used the regular Stampin Up ink pads to color in the images. I used a since night light that is used at Christmas for the little houses to light up the block. Many of the club members used a small string of Christmas lights and fed them into the hole. We used thick wire ribbon to tie the top. I am thinking about some great teachers gifts!!!

Sunday, October 17, 2010

Where has the time gone?

I have been busy doing a lot with my cricut and gypsy. Super SUPER excited about the new update for the gyspy that includes some cartridges. Ill post some pictures soon but will be posting pictures of my projects for this weekend's hostess club!!!

Wednesday, September 29, 2010

Happy Crafting!!!

We had a great first Hostess club, lots of laughs and we had some real crafty ladies. Working on next months projects and hope everyone can come out!!! Ill post some more pictures soon!!!

Monday, September 20, 2010

Halloween Treats


Frankie is made with Stampin Up Top Note. Old Olive & Black Paper. The treat bags are in the catalog and lots of fun to play with. The stuff on his face is just hand drawn to add some scars.

Sunday, September 19, 2010

Cupcake Birthday Watercolors

I used the Crazy for Cupcakes Stamp and colored it in with watercolor pencils. Pretty simple technique but I thought it might be good for my upcoming hostess club Sunday. I just cut some Stampin Up Simply Scrappin paper in 1/2 inch by 4 1/4 inch strips and rolled the edges for some extra texture.

Friday, September 17, 2010

Its kind of a rough picture because I had to use my phone because my husband hijacked mine :) They are 1"x8" cellophane bags with M&M's inside. I just picked through a big bag I had hidden for the colors I wanted. I used Stampin Up Punches Curly Label, and both tags. Frankenstien is just handdrawn with some scars and googly eyes. Smaller Frankie is just one label but it just didn't seem big enough. Got my juices flowing!!

Sunday, September 12, 2010

Big News!!!


I decided to become a Stampin' Up! Demonstrator. I love stamping and scrapbooking and I really missed doing it with my friends so I decided to become a demonstrator. My first club is Sunday, September 26th at 2:00 pm. I cant wait. Ill post what we will be making soon!!! Also check out the tote you can get if you sign up before October 18th!!! Even if you are just a hobbyist, you get a great package of stuff that values well over $300 for just $175. The tote alone is worth $39.95!! Give me a shout if you are interested!!!

Friday, August 6, 2010

Pictures


Busy Busy Busy

I have been cleaning my scrapbook room, which actually makes it so I can get to my desk:) I'll take pictures of my room later when it's finished but I'll post them when I get it completed. (or atleast completed for now. Here's some more pictures!!

Tuesday, August 3, 2010

Build-A-Birthday


Stampin Up has a great set of build-a-bear dies by Sizzix. LOVE THEM!!! I used some leftover paper from the Stampin Up Scrapbooking Kit, the Big Note Die, the Beary Birthday Stamp Set, Taken With Turquoise. I used two types of watercoloring here the pencils and the blender pens on the ink pad. You can't tell by the picture but the balloons are shiny from embossing them after belnder pen watercoloring them. Have a great night!!!

Thursday, July 15, 2010

Back at it :)


I made this before I left for vacation...it was the invitation to my daughter's Luau birthday. It was a great time. I used the Life's a Beach Cartridge, $1 ribbon I found at Michaels, Stampin Up Ink Pads Lavender Lace, and Green Galore to distress. Love the color combination. :)

Thursday, July 1, 2010

"
Cartridge: Life Is A Beach
Cut Luau Girl to 4.75 in skin tone paper
Cut Layers In Stampin’ Up Chocolate Chip Paper & Pixie Pink
Cuttlebug Embossing Folder: Floral Screen on Turquoise
4 ¼ x 5 ½ Size Card Stampin’ Up Paper Kraft
4 x 5 ¼ and 2 x 1 ½ Cut Stampin’ Up Pixie Pink Paper
3 ¾ x 5 Cut Stampin’ Up Tempting Turquoise Paper
Stamp Pads: Stampin’ Up Pixie Pink, Tempting Turquoise, & Chocolate Chip
Stamp Sets: Peachy Keen ~Everyday Face Assortment
Studio G ~Let’s Party
Extras: Shrinky Dink Paper Punched with 5 point Flower punch and colored in pink and green. Flower in her hair.
5” Scrap Pink Velvet Ribbon
2 Green Galore Brads
Liquid Glass (centers of the flowers)
Glitter
Bleach Pen to add grass skirt texture to Chocolate Chip Paper Skirt Layer"

Luau Girl


Happy July to everyone!!! I can't believe that it is July already. We are at my sister's in Phoenix enjoying some real family family time. This a card I made before I left and thought it turned out cute. Pretty simple techniques but a fun card.

Monday, June 28, 2010

Crabby Luau


Crabby Luau Shadowbox Card
Life is a Beach Cricut Cartride 5x5
Stampin Up Sand Paper
Close To My Heart Beach Stamp Set
Wet Looks Embass Markers
Clear Emboss Powder
Water Paper (Back of Shadowbox)
Scrap Beach Paper for the Towel
Luau Cut 1 1/2

Thursday, June 24, 2010

Monthly Challenge So Far So Good :)


I have been doing something everyday! I am so proud even if it's something little. My daughter and I played with shrinky dinks and the cricut today!!! It was so much fun! We only used one paper but she keeps coming back for more :) Some were done with the Cricut, but the little flowers were the Stampin Up Punch. Colored in with permanent markers, learned they get a lot LOT darker when you shrinky.

Tuesday, June 22, 2010

Cleaning...Organizing....Cleaning...Organizing & Vinyl

I have been busy mad cleaning in my scrapbook room trying to become more efficient... I also made some signs for the cars :) I am in love with vinyl!!! Right now I am looking for a better way to store and organize my stamps. I seem to have trouble knowing what I have so I use them more... hmmm another mission :)

Sunday, June 20, 2010

Mickey Mouse 8.5 x 8.5 Front Page


The white paper with the camera shows where to put the picture after they get back from DisneyWorld.

Happy Father's Day to Everyone!!!

Had a great day with my husband and daughter! Everything Daddy wanted to do (and a trip to Joann's). My daughter and I scrapbooked yesterday, thats a great step in my mission for creativity. We completed an entire Disney 8 1/2 x 8 1/2 album in a couple hours. It was for her friend's birthday. Today I have been working on card ideas for my daughters upcoming Luau 8th Birthday Party!!! I tried to take a picture of a couple Disney pages before we wrapped it but they didnt turn out so hot :(

Saturday, June 19, 2010

Creative Slideshow

Update...

I have been creating, not as much as I'd like to but I am vowing to become more regular about it. I have been doing a lot of projects for my daughter's school. I have a lot of pending projects so I am going to get them done. Thanks to all the blogs that have inspired me!!!